【Rails3.2系開発】form_tagヘルパー利用時に"utf8=なんたら"というパラメータを吐かないようにした事 [rails]
仕事でハマったのでメモがてら。
Railsで"form_tag"ヘルパーを利用してformを作り、パラメータをGETで飛ばすと"?utf8=✓"みたいな変なパラメータがくっついてしまいます。
まぁ実害は・・・多分ないと思うけど、鬱陶しいのでそれを外す方法。
と何気なくformを作成しようとすると、
な感じになって、変なパラメータがひっついてきます。
POSTだといいけど、GETだと若干かっこ悪いです。
てか、そもそもコレは何の為?
って事で、調べてみると古いIE対策?みたいな事が言われてました。
>The _utf8 input tag forces Internet Explorer to properly respect your form’s character encoding.
Rails forms automatically insert a hidden utf8 field? (a.k.a. what’s with the checkmark/snowman?)
古いIEと言われても、私の中ではIEはもうIE8以前は葬式上げてもいいよレベルな旧型だと思ってるので、そんだけ言われても困る。
って事でさらに調べると、どうやらIE5(笑)らしい。
> This is here to support Internet Explorer 5 and encourage it to use UTF-8 for its forms.
What is the _snowman param in Ruby on Rails 3 forms for?
IE5とか全身全霊を込めてSHIRUKA!と叫べるレベルなので安心して消すことにします。
上記URLの中でも、我々が運用しているサービスはそんな古いIEは相手にしてないみたいな事を書かれてるしw 何で残ってるんだ。。。
で、消し方なんですが"FormTagHelper"ヘルパー内の"utf8_enforcer_tag"メソッドで上記の余計な事をやっているみたいなので、これをoverrideすればいいらしいです。
Override utf8_enforcer_tag using Rails custom form builder?
overrideのやり方は上記URLに書いてあるとおり、"config/initializers"配下に適当なファイルを作って上書きする処理を書くだけ。
railsを再起動し、上記formを表示すると・・消えてる!
と、思ったら別画面のformで"authenticity_token"が丸見え状態に!!
ぶっちゃけリリース直前まで行ったよ!マジかよ怖すぎる!!
さらに調べると戻り値に対して(空文字であっても)サニタイズが掛かっていないと、自動で付与される別のhiddenタグごとサニタイズしてしまうみたい。
なので以下の様に直しました。
これでちゃんと表示されず、他のformも問題なく表示されるようになりました。
なお自分の調べ方が悪かったのか、あまり日本語サイトに情報がなかったので、もし同じ目にあってる方の参考になれば。
実は特定バージョンだけ出る変なバグなのか、他にもっといい方法があるのかも。
参考までにrailsとrubyのバージョンは↓な感じです。
# rails3.2.13(ruby 1.9.3p374)
Railsで"form_tag"ヘルパーを利用してformを作り、パラメータをGETで飛ばすと"?utf8=✓"みたいな変なパラメータがくっついてしまいます。
まぁ実害は・・・多分ないと思うけど、鬱陶しいのでそれを外す方法。
<%= form_tag("/hoge", :method => :get) %>
  <%= テキストタグとか %>
<%- end -%>
と何気なくformを作成しようとすると、
な感じになって、変なパラメータがひっついてきます。
POSTだといいけど、GETだと若干かっこ悪いです。
てか、そもそもコレは何の為?
って事で、調べてみると古いIE対策?みたいな事が言われてました。
>The _utf8 input tag forces Internet Explorer to properly respect your form’s character encoding.
Rails forms automatically insert a hidden utf8 field? (a.k.a. what’s with the checkmark/snowman?)
古いIEと言われても、私の中ではIEはもうIE8以前は葬式上げてもいいよレベルな旧型だと思ってるので、そんだけ言われても困る。
って事でさらに調べると、どうやらIE5(笑)らしい。
> This is here to support Internet Explorer 5 and encourage it to use UTF-8 for its forms.
What is the _snowman param in Ruby on Rails 3 forms for?
IE5とか全身全霊を込めてSHIRUKA!と叫べるレベルなので安心して消すことにします。
上記URLの中でも、我々が運用しているサービスはそんな古いIEは相手にしてないみたいな事を書かれてるしw 何で残ってるんだ。。。
で、消し方なんですが"FormTagHelper"ヘルパー内の"utf8_enforcer_tag"メソッドで上記の余計な事をやっているみたいなので、これをoverrideすればいいらしいです。
Override utf8_enforcer_tag using Rails custom form builder?
overrideのやり方は上記URLに書いてあるとおり、"config/initializers"配下に適当なファイルを作って上書きする処理を書くだけ。
# coding: utf-8
module ActionView
  module Helpers
    module FormTagHelper
      def utf8_enforcer_tag
        ""
      end
    end
  end
end
railsを再起動し、上記formを表示すると・・消えてる!
と、思ったら別画面のformで"authenticity_token"が丸見え状態に!!
ぶっちゃけリリース直前まで行ったよ!マジかよ怖すぎる!!
さらに調べると戻り値に対して(空文字であっても)サニタイズが掛かっていないと、自動で付与される別のhiddenタグごとサニタイズしてしまうみたい。
なので以下の様に直しました。
# coding: utf-8
module ActionView
  module Helpers
    module FormTagHelper
      def utf8_enforcer_tag
        "".html_safe
      end
    end
  end
end
これでちゃんと表示されず、他のformも問題なく表示されるようになりました。
なお自分の調べ方が悪かったのか、あまり日本語サイトに情報がなかったので、もし同じ目にあってる方の参考になれば。
実は特定バージョンだけ出る変なバグなのか、他にもっといい方法があるのかも。
参考までにrailsとrubyのバージョンは↓な感じです。
# rails3.2.13(ruby 1.9.3p374)
【Rails(3.2系)開発】GWも終盤だし社会復帰を兼ねてpryを使ってみる [rails]
GWなので何かやってみようと思い、irbより便利と噂に聞いてたpryを導入してみる。
まずはインストール。
エラーが。。。RDoc関連で怒られてる。
RDocをインストールしないようにオプションを付けて再チャレンジ。
1回アンインストールして"--no-ri --no-rdoc"オプションを付けて再インストール。
今度はうまくいったかな。
早速叩いてみる。
コマンドが見つからない。
ってrbenvで管理されているからrehash忘れてた。
無事に動くようになりました。
こっからはpryの便利さについて検証。
■ハイライト
適当なハッシュを定義してみる。

おぉ。確かに色付けされた! これはいい。
# irbで同じハッシュを定義した場合

■シェルコマンド
コマンドラインで直接シェルが叩けるようになってるみたいです。
シェルコマンドの場合は頭に「.(ドット)」を付けて実行。
頭に「.(ドット)」を入れないとならないので、普段の感じで叩くとNameErrorが連発。。。w
でも、ターミナルで別タブで立ち上げなくてもlsやgrepなどお馴染みコマンドを叩けるのは便利。
■Tab補完
個人的には目玉と言ってもいい機能。これを見て入れることを決心したと言っても過言じゃない。
残り文字が補完される!
さらに候補が複数ある場合は、その候補が表示される。
もう鬼便利。
■オブジェクトの実装が読める
定義されたオブジェクトの中身、rubyだけじゃなくcで書かれたコードも読めるらしい。
読むためには"show-method"コマンドを叩く。
あらエラーが。。。
どうやらCで書かれたコードを読むためには'pry-doc'を入れないとダメらしい。
そういえば'pry-doc'は、インストール時にエラーが出て外してた。
エラーはRDocで関係ないし'pry-doc'も入れる事にする。
もう一度叩く。"show-method"もタブ補完が効くので便利ですね。
# うまくブログに表示されなかったのでコードの一部を全角化してます
もちろん独自実装したメソッドの中身も。
これでデバック作業が捗りそう。
■Rails Consoleで利用する
思っていた以上に便利なpryですが、"rails console"では普段通り"irb"が利用されてしまいます。
切り替える方法がないと調べたら、いくつか方法はあるみたいです。
その中でも'pry-rails' gemを利用したやり方が一番ラクそうだったのでそれでやってみる事にします。
# ただしRails3.0以上
bundleでインストールする。
"rails console"を立ち上げる。
"pry"に変わった!
Railsオブジェクトの中身を見れるようになりますね。
さらに"show-routes"でroutes情報が見れるらしい。
"grep"も使える・・やだなにこれ便利。
思ってた以上に便利ですね。もっと早く使えば良かった。。。
他にも色々な機能やプラグインなんかもあるみたいなので、これから使いこなしていきたいと思います。
参考にさせて貰ったサイト:
・Rubyistよ、irbを捨ててPryを使おう
・irbの代わりにPryを使ってみた
・【Rails】RailsコンソールがPryで起動できる「pry-rails」
まずはインストール。
% gem install pry pry-doc
Fetching: coderay-1.0.9.gem (100%)
Fetching: slop-3.4.4.gem (100%)
Fetching: method_source-0.8.1.gem (100%)
Fetching: pry-0.9.12.1.gem (100%)
Successfully installed coderay-1.0.9
Successfully installed slop-3.4.4
Successfully installed method_source-0.8.1
Successfully installed pry-0.9.12.1
Fetching: yard-0.8.6.1.gem (100%)
Fetching: pry-doc-0.4.5.gem (100%)
Successfully installed yard-0.8.6.1
Successfully installed pry-doc-0.4.5
6 gems installed
Installing ri documentation for coderay-1.0.9...
Installing ri documentation for slop-3.4.4...
Installing ri documentation for method_source-0.8.1...
Installing ri documentation for pry-0.9.12.1...

RDoc::Parser::Ruby failure around line 25 of
lib/pry/commands/ls.rb

Before reporting this, could you check that the file you're documenting
has proper syntax:

  /Users/******/.rbenv/versions/1.9.3-p374/bin/ruby -c lib/pry/commands/ls.rb

RDoc is not a full Ruby parser and will fail when fed invalid ruby programs.

The internal error was:

     (NoMethodError) undefined method `name' for #

ERROR:  While generating documentation for pry-0.9.12.1
... MESSAGE:   undefined method `name' for #
... RDOC args: --ri --op /Users/******/.rbenv/versions/1.9.3-p374/lib/ruby/gems/1.9.1/doc/pry-0.9.12.1/ri lib --title pry-0.9.12.1 Documentation --quiet
エラーが。。。RDoc関連で怒られてる。
RDocをインストールしないようにオプションを付けて再チャレンジ。
1回アンインストールして"--no-ri --no-rdoc"オプションを付けて再インストール。
% gem uninstall pry pry-doc

You have requested to uninstall the gem:
     pry-0.9.12.1
pry-doc-0.4.5 depends on [pry (>= 0.9)]
If you remove this gems, one or more dependencies will not be met.
Continue with Uninstall? [Yn]  Y
Remove executables:
     pry

in addition to the gem? [Yn]  Y
Removing pry
Successfully uninstalled pry-0.9.12.1
Successfully uninstalled pry-doc-0.4.5

% gem install pry --no-ri --no-rdoc
Fetching: pry-0.9.12.1.gem (100%)
Successfully installed pry-0.9.12.1
1 gem installed
今度はうまくいったかな。
早速叩いてみる。
% pry
zsh: command not found: pry
コマンドが見つからない。
ってrbenvで管理されているからrehash忘れてた。
% rbenv rehash
% pry
[1] pry(main)>
無事に動くようになりました。
こっからはpryの便利さについて検証。
■ハイライト
適当なハッシュを定義してみる。
おぉ。確かに色付けされた! これはいい。
# irbで同じハッシュを定義した場合
■シェルコマンド
コマンドラインで直接シェルが叩けるようになってるみたいです。
シェルコマンドの場合は頭に「.(ドット)」を付けて実行。
[1] pry(main)> .pwd
/Users/******/.rbenv/versions/1.9.3-p374
[2] pry(main)> .ls
bin     include lib     share
[3] pry(main)> .cd bin
[4] pry(main)> .ls | grep passen
passenger
passenger-config
passenger-install-apache2-module
passenger-install-nginx-module
passenger-memory-stats
passenger-status
頭に「.(ドット)」を入れないとならないので、普段の感じで叩くとNameErrorが連発。。。w
でも、ターミナルで別タブで立ち上げなくてもlsやgrepなどお馴染みコマンドを叩けるのは便利。
■Tab補完
個人的には目玉と言ってもいい機能。これを見て入れることを決心したと言っても過言じゃない。
[1] pry(main)> a = "hoge"
=> "hoge"

[2] pry(main)> a.len

# ここでタブを押す↓↓↓

[2] pry(main)> a.length
残り文字が補完される!
さらに候補が複数ある場合は、その候補が表示される。
[3] pry(main)> a.to_
a.to_c     a.to_enum  a.to_f     a.to_i     a.to_r     a.to_s     a.to_str   a.to_sym
もう鬼便利。
■オブジェクトの実装が読める
定義されたオブジェクトの中身、rubyだけじゃなくcで書かれたコードも読めるらしい。
読むためには"show-method"コマンドを叩く。
[1] pry(main)> show-method Array#each
Error: Cannot locate this method: each. Try `gem-install pry-doc` to get access to Ruby Core documentation.
あらエラーが。。。
どうやらCで書かれたコードを読むためには'pry-doc'を入れないとダメらしい。
そういえば'pry-doc'は、インストール時にエラーが出て外してた。
エラーはRDocで関係ないし'pry-doc'も入れる事にする。
% gem install pry-doc --no-ri --no-rdoc
Fetching: pry-doc-0.4.5.gem (100%)
Successfully installed pry-doc-0.4.5
1 gem installed
% rbenv rehash
もう一度叩く。"show-method"もタブ補完が効くので便利ですね。
[1] pry(main)> show-method Array#each

From: array.c (C Method):
Owner: Array
Visibility: public
Number of lines: 12

VALUE
rb_ary_each(VALUE array)
{
    long i;
    volatile VALUE ary = array;

    RETURN_ENUMERATOR(ary, 0, 0);
    for (i=0; i<RARRAY_LEN(ary); i++){
      rb_yield(RARRAY_PTR(ary)[i]);
    }
    return ary;
}
# うまくブログに表示されなかったのでコードの一部を全角化してます
もちろん独自実装したメソッドの中身も。
[2] pry(main)> def hoge
[2] pry(main)*   return "test"
[2] pry(main)* end
=> nil
[3] pry(main)> show-method hoge

From: (pry) @ line 1:
Owner: Object
Visibility: private
Number of lines: 3

def hoge
  return "test"
end
これでデバック作業が捗りそう。
■Rails Consoleで利用する
思っていた以上に便利なpryですが、"rails console"では普段通り"irb"が利用されてしまいます。
切り替える方法がないと調べたら、いくつか方法はあるみたいです。
その中でも'pry-rails' gemを利用したやり方が一番ラクそうだったのでそれでやってみる事にします。
# ただしRails3.0以上
% vim Gemfile
---------------------------------------------------------------
# rails console をpryで起動
gem 'pry-rails'
---------------------------------------------------------------
bundleでインストールする。
% bundle install --path vendor/bundle
(中略)
Installing method_source (0.8.1)
Installing slop (3.4.4)
Installing pry (0.9.12.1)
Installing pry-rails (0.2.2)
"rails console"を立ち上げる。
% bundle exec rails console
Loading development environment (Rails 3.2.13)
[1] pry(main)>
"pry"に変わった!
Railsオブジェクトの中身を見れるようになりますね。
[2] pry(main)> show-method ActiveRecord::Base#initialize

From: /Users/*******/Development/my_app/vendor/bundle/ruby/1.9.1/gems/activerecord-3.2.13/lib/active_record/base.rb @ line 481:
Owner: ActiveRecord::Base
Visibility: private
Number of lines: 22

def initialize(attributes = nil, options = {})
  defaults = Hash[self.class.column_defaults.map { |k, v| [k, v.duplicable? ? v.dup : v] }]
  @attributes = self.class.initialize_attributes(defaults)
  @association_cache = {}
  @aggregation_cache = {}
  @attributes_cache = {}
  @new_record = true
  @readonly = false
  @destroyed = false
  @marked_for_destruction = false
  @previously_changed = {}
  @changed_attributes = {}

  ensure_proper_type

  populate_with_current_scope_attributes

  assign_attributes(attributes, options) if attributes

  yield self if block_given?
  run_callbacks :initialize
end
さらに"show-routes"でroutes情報が見れるらしい。
[3] pry(main)> show-routes

          user_session POST   /users/sign_in(.:format)       devise/sessions#create
  destroy_user_session DELETE /users/sign_out(.:format)      devise/sessions#destroy
    edit_user_password GET    /users/password/edit(.:format) devise/passwords#edit
edit_user_registration DELETE /users(.:format)               devise/registrations#destroy
                  root        /                              top#index
"grep"も使える・・やだなにこれ便利。
[8] pry(main)> show-routes --grep devise
          user_session POST   /users/sign_in(.:format)       devise/sessions#create
  destroy_user_session DELETE /users/sign_out(.:format)      devise/sessions#destroy
    edit_user_password GET    /users/password/edit(.:format) devise/passwords#edit
edit_user_registration DELETE /users(.:format)               devise/registrations#destroy
思ってた以上に便利ですね。もっと早く使えば良かった。。。
他にも色々な機能やプラグインなんかもあるみたいなので、これから使いこなしていきたいと思います。
参考にさせて貰ったサイト:
・Rubyistよ、irbを捨ててPryを使おう
・irbの代わりにPryを使ってみた
・【Rails】RailsコンソールがPryで起動できる「pry-rails」
【Rails(3.2系)開発】deviseを利用して認証処理を作ってみる(機能絞り込み) [rails]
これまでに引き続きdeviseプラグインを利用した認証処理について。
・【Rails(3.2系)開発】deviseを利用して認証処理を作ってみる(導入編)
・【Rails(3.2系)開発】deviseを利用して認証処理を作ってみる(日本語化)
今回は機能の絞り込みを行います。
実際にインストールして色々と触ってみるとわかると思いますが、deviseを使うと認証に必要なひと通りの機能を有しています。
要件が全ての機能を必要とする案件であれば問題ないのですが、だいたいの場合はこの中から2,3の機能で事足りてしまうと思います。
単純に使わないのであれば、入り口となるリンクを閉じて対象のロジックを走らせないようにすればいいのですが、それだと直接URLを叩けば見れてしまいます。
deviseプラグインでは機能のカテゴリ単位となりますが必要としない機能を利用しない方法もあるので、それを利用して必要以外の機能を利用しないように絞りたいと思います。
まずはdeviseが提供している機能をrake routesコマンドを利用して見てみます。
とりあえず最低限の機能ということでログイン・ログアウト機能以外を削除します。
機能を絞るにはconfig/routes.rbを変更します。
deviseで提供されているURLは、この"devise_for :users"の1行で生成されています。
機能を絞るためにはオプションで":only"、または":skip"パラメータを付けて制限します。
> :only [使いたい機能]
> :skip [省きたい機能]
どちらも結果的には同じになるし、好みに応じて利用すればいいと思います。
ただし、":only"と":skip"の両方のオプションが指定された場合は":only"が優先されます。
ログイン・ログアウト機能のみを利用できるようにしたいので、":only"パラメータに":sessions"を指定します。
"rake routes"でURLを確認します。
":skip"オプションでも同様の事をやってみます。
必要ない機能を指定する必要があるので、"passwords"と"registrations"を指定します。
"rake routes"でURLを確認します。
これでカテゴリ単位では絞ることが出来ました。
なお、カテゴリより狭い範囲の各URLごとに絞る事も出来ます。
若干記述が面倒になりますが "skip:"オプションにあえて":all"パラメータを指定し、ブロック内でURLを再定義する事で制御できます。
routesを確認します。
URLを再定義しているので、独自にURLやルート名を振れる事も出来ます。
・【Rails(3.2系)開発】deviseを利用して認証処理を作ってみる(導入編)
・【Rails(3.2系)開発】deviseを利用して認証処理を作ってみる(日本語化)
今回は機能の絞り込みを行います。
実際にインストールして色々と触ってみるとわかると思いますが、deviseを使うと認証に必要なひと通りの機能を有しています。
要件が全ての機能を必要とする案件であれば問題ないのですが、だいたいの場合はこの中から2,3の機能で事足りてしまうと思います。
単純に使わないのであれば、入り口となるリンクを閉じて対象のロジックを走らせないようにすればいいのですが、それだと直接URLを叩けば見れてしまいます。
deviseプラグインでは機能のカテゴリ単位となりますが必要としない機能を利用しない方法もあるので、それを利用して必要以外の機能を利用しないように絞りたいと思います。
まずはdeviseが提供している機能をrake routesコマンドを利用して見てみます。
% bundle exec rake routes
        new_user_session GET    /users/sign_in(.:format)       devise/sessions#new
            user_session POST   /users/sign_in(.:format)       devise/sessions#create
    destroy_user_session DELETE /users/sign_out(.:format)      devise/sessions#destroy
           user_password POST   /users/password(.:format)      devise/passwords#create
       new_user_password GET    /users/password/new(.:format)  devise/passwords#new
      edit_user_password GET    /users/password/edit(.:format) devise/passwords#edit
                         PUT    /users/password(.:format)      devise/passwords#update
cancel_user_registration GET    /users/cancel(.:format)        devise/registrations#cancel
       user_registration POST   /users(.:format)               devise/registrations#create
   new_user_registration GET    /users/sign_up(.:format)       devise/registrations#new
  edit_user_registration GET    /users/edit(.:format)          devise/registrations#edit
                         PUT    /users(.:format)               devise/registrations#update
                         DELETE /users(.:format)               devise/registrations#destroy
とりあえず最低限の機能ということでログイン・ログアウト機能以外を削除します。
機能を絞るにはconfig/routes.rbを変更します。
% vim config/routes.rb
--------------------------------------------------------------------------------
MyApp::Application.routes.draw do
  devise_for :users
  (中略)
end
--------------------------------------------------------------------------------
deviseで提供されているURLは、この"devise_for :users"の1行で生成されています。
機能を絞るためにはオプションで":only"、または":skip"パラメータを付けて制限します。
> :only [使いたい機能]
> :skip [省きたい機能]
どちらも結果的には同じになるし、好みに応じて利用すればいいと思います。
ただし、":only"と":skip"の両方のオプションが指定された場合は":only"が優先されます。
# 参考
% vim vendor/bundle/ruby/1.9.1/gems/devise-2.2.3/lib/devise/mapping.rb
--------------------------------------------------------------------------------
def default_used_route(options)
  singularizer = lambda { |s| s.to_s.singularize.to_sym }

  if options.has_key?(:only)
    @used_routes = self.routes & Array(options[:only]).map(&singularizer)
  elsif options[:skip] == :all
    @used_routes = []
  else
    @used_routes = self.routes - Array(options[:skip]).map(&singularizer)
  end
end
--------------------------------------------------------------------------------
ログイン・ログアウト機能のみを利用できるようにしたいので、":only"パラメータに":sessions"を指定します。
% vim config/routes.rb
--------------------------------------------------------------------------------
MyApp::Application.routes.draw do
  devise_for :users, only: [:sessions]
  (中略)
end
--------------------------------------------------------------------------------
"rake routes"でURLを確認します。
% bundle exec rake routes
    new_user_session GET    /users/sign_in(.:format)  devise/sessions#new
        user_session POST   /users/sign_in(.:format)  devise/sessions#create
destroy_user_session DELETE /users/sign_out(.:format) devise/sessions#destroy
":skip"オプションでも同様の事をやってみます。
必要ない機能を指定する必要があるので、"passwords"と"registrations"を指定します。
% vim config/routes.rb
--------------------------------------------------------------------------------
MyApp::Application.routes.draw do
  devise_for :users, skip: [:passwords, :registration]
  (中略)
end
--------------------------------------------------------------------------------
"rake routes"でURLを確認します。
% bundle exec rake routes
    new_user_session GET    /users/sign_in(.:format)  devise/sessions#new
        user_session POST   /users/sign_in(.:format)  devise/sessions#create
destroy_user_session DELETE /users/sign_out(.:format) devise/sessions#destroy
これでカテゴリ単位では絞ることが出来ました。
なお、カテゴリより狭い範囲の各URLごとに絞る事も出来ます。
若干記述が面倒になりますが "skip:"オプションにあえて":all"パラメータを指定し、ブロック内でURLを再定義する事で制御できます。
% vim config/routes.rb
--------------------------------------------------------------------------------
MyApp::Application.routes.draw do
  devise_for :users, skip: :all do
    post   '/users/sign_in(.:format)',
      to: 'devise/sessions#create', as: :user_session
    delete '/users/sign_out(.:format)',
      to: 'devise/sessions#destroy', as: :destroy_user_session
    get    '/users/password/edit(.:format)',
      to: 'devise/passwords#edit', as: :edit_user_password
    delete '/users(.:format)',
      to: 'devise/registrations#destroy', as: :edit_user_registration
  end
  (中略)
end
--------------------------------------------------------------------------------
routesを確認します。
% bundle exec rake routes
          user_session POST   /users/sign_in(.:format)       devise/sessions#create
  destroy_user_session DELETE /users/sign_out(.:format)      devise/sessions#destroy
    edit_user_password GET    /users/password/edit(.:format) devise/passwords#edit
edit_user_registration DELETE /users(.:format)               devise/registrations#destroy
URLを再定義しているので、独自にURLやルート名を振れる事も出来ます。
【Rails(3.2系)開発】deviseを利用して認証処理を作ってみる(日本語化) [rails]
前回に引き続きdeviseプラグインを利用した認証処理について。
【Rails(3.2系)開発】deviseを利用して認証処理を作ってみる(導入編)
今回は日本語化を進めてみます。
日本語化するのは以下の2点。
・テンプレート
・メッセージ
日本語化する方法も2つあって、1つは読み込むテンプレートを直接日本語に変更するやり方。
もう1つはrailsのi18nという多言語化の仕組みを利用するやり方。
今回はテンプレートは直接変更する方法で、メッセージ系はi18nを利用した多言語化ファイルを作成するやり方で進めて行きます。
まずはテンプレートの日本語化から。
まぁ直接テンプレートを上書きするだけなので、これを日本語化と言っていいか微妙だけど。
前回の導入編にてカスタマイズテンプレートを作成済なのでそれを元に変更します。
app/views/devise配下につくられたテンプレートごとの機能は以下な感じ。
# ざっくりな訳なので間違ってたらゴメン
とりあえずログイン(Sign in)ページだけ日本語で手直ししてみる。
shared/_links.html.erbは英語のままだけど気にしない。
WEBrickを起動してsign_inページを開いてみると日本語になっている事を確認(当たり前だけど)。
http://localhost:3000/users/sign_in

この状態でemailやパスワードが空の状態でログインしようとすると英語のメッセージが表示されます。
次にこれらメッセージを日本語化します。
deviseのメッセージ類はdefaultで英語のi18nの多言語化ファイル(config/locales/devise.en.yml)が作成されています。
i18nとは何ぞや?となると思いますが、簡単に言うと1つのサイトを複数の言語に対応させるための仕組みです。
具体的には、それぞれの言語(国)別の辞書ファイルみたいなのを作成し、それを利用して多言語化を実現します。
なので日本語するためにはdeviseの日本語用の多言語化ファイルを作成する必要があります。
既にある英語の多言語化ファイルをベースに日本語化のファイルを作成します。
devise.ja.ymlは、guthubなどで公開してくれている人のを参考に足りないトコは自分で訳す感じで作りました。
訳はだいぶざっくりなので意味合い違ってたらゴメン。
なお、利用しているdeviseのバージョンは2.2.3です。
参考にさせて貰ったdevise.ja.yml
github: Junsuke / miscellaneous / devise.ja.yml
作成が終わったら設定のlocaleを"ja"に変更して日本語の多言語化ファイルを読み込むようにします。
WEBrickの起動、またはrailsを再起動してsign_inページを開きます。
email、パスワード未入力などで何らかのメッセージが画面に表示される操作を行い、メッセージが日本語になっている事を確認します。
http://localhost:3000/users/sign_in

細かいとこの日本語化は進めながらやるとして、とりあえず日本語化が出来ました。
【Rails(3.2系)開発】deviseを利用して認証処理を作ってみる(導入編)
今回は日本語化を進めてみます。
日本語化するのは以下の2点。
・テンプレート
・メッセージ
日本語化する方法も2つあって、1つは読み込むテンプレートを直接日本語に変更するやり方。
もう1つはrailsのi18nという多言語化の仕組みを利用するやり方。
今回はテンプレートは直接変更する方法で、メッセージ系はi18nを利用した多言語化ファイルを作成するやり方で進めて行きます。
まずはテンプレートの日本語化から。
まぁ直接テンプレートを上書きするだけなので、これを日本語化と言っていいか微妙だけど。
前回の導入編にてカスタマイズテンプレートを作成済なのでそれを元に変更します。
# カスタマイズテンプレートを生成する
% bundle exec rails g devise:views
app/views/devise配下につくられたテンプレートごとの機能は以下な感じ。
# ざっくりな訳なので間違ってたらゴメン
confirmations/
  # 正式登録の確認
  - new.html.erb
mailer/
  # 正式登録の案内
  - confirmation_instructions.html.erb
  # パスワード再発行の案内
  - reset_password_instructions.html.erb
  # アカウントロックの案内
  - unlock_instructions.html.erb
passwords/
  # パスワードの変更
  - edit.html.erb
  # パスワードの再発行
  - new.html.erb
registrations/
  # アカウント情報の更新/削除
  - edit.html.erb
  # アカウント情報の作成
  - new.html.erb
sessions/
  # ログイン(Sign in)
  - new.html.erb
shared/
  # footer部に表示されるリンク一覧
  - _links.erb
unlocks/
  # アカウントロックの解消
  - new.html.erb
とりあえずログイン(Sign in)ページだけ日本語で手直ししてみる。
% vim app/views/devise/sessions/new.html.erb -----------------------------------------------------------------------ログインページ
<%= form_for(resource, :as => resource_name, :url => session_path(resource_name)) do |f| %>メールアドレス:
<%= f.email_field :email, :autofocus => true %>パスワード:<% if devise_mapping.rememberable? -%>
<%= f.password_field :password %><%= f.check_box :remember_me %> 次回以降自動的にログインする<% end -%><%= f.submit "ログインする" %><% end %> <%= render "devise/shared/links" %> -----------------------------------------------------------------------
shared/_links.html.erbは英語のままだけど気にしない。
WEBrickを起動してsign_inページを開いてみると日本語になっている事を確認(当たり前だけど)。
http://localhost:3000/users/sign_in

この状態でemailやパスワードが空の状態でログインしようとすると英語のメッセージが表示されます。
次にこれらメッセージを日本語化します。
deviseのメッセージ類はdefaultで英語のi18nの多言語化ファイル(config/locales/devise.en.yml)が作成されています。
i18nとは何ぞや?となると思いますが、簡単に言うと1つのサイトを複数の言語に対応させるための仕組みです。
具体的には、それぞれの言語(国)別の辞書ファイルみたいなのを作成し、それを利用して多言語化を実現します。
なので日本語するためにはdeviseの日本語用の多言語化ファイルを作成する必要があります。
既にある英語の多言語化ファイルをベースに日本語化のファイルを作成します。
% cp config/locales/devise.en.yml config/locales/devise.ja.yml
% vim config/locales/devise.ja.yml
-----------------------------------------------------------------------
# Additional translations at https://github.com/plataformatec/devise/wiki/I18n
# Japanese translation for devise

ja:
  devise:
    confirmations:
      # Your account was successfully confirmed. You are now signed in.
      confirmed: "アカウントが確認されました。ログインしています。"
      # You will receive an email with instructions about how to confirm your account in a few minutes.
      send_instructions: "アカウントの確認方法を数分以内にメールでご連絡します。"
      # If your email address exists in our database, you will receive an email with instructions about how to confirm your account in a few minutes.
      send_paranoid_instructions: "ご登録のメールアドレスが保存されている場合、アカウントの確認方法をメールでご連絡します。"
    failure:
      # You are already signed in.
      already_authenticated: "ログイン済みです。"
      # Your account was not activated yet.
      inactive: "アカウントがまだ有効になっていません。"
      # Invalid email or password.
      invalid: "メールアドレスまたはパスワードが違います。"
      # Invalid authentication token.
      invalid_token: "認証キーが不正です。"
      # Your account is locked.
      locked: "アカウントはロックされています。"
      # Invalid email or password.
      not_found_in_database: "メールアドレスまたはパスワードが無効です。"
      # Your session expired, please sign in again to continue.
      timeout: "一定時間が経過したため、再度ログインが必要です"
      # You need to sign in or sign up before continuing.
      unauthenticated: "ログインまたは登録が必要です。"
      # You have to confirm your account before continuing.
      unconfirmed: "本登録を行ってください。"
    mailer:
      confirmation_instructions:
        # Confirmation instructions
        subject: "アカウントの登録方法"
      reset_password_instructions:
        # Reset password instructions
        subject: "パスワードの再設定"
      unlock_instructions:
        # Unlock Instructions
        subject: "アカウントのロック解除"
    omniauth_callbacks:
      # Could not authenticate you from %{kind} because \"%{reason}\".
      failure: "%{kind} から承認されませんでした。理由:%{reason}"
      # Successfully authenticated from %{kind} account.
      success: "%{kind} から承認されました。"
    passwords:
      # You can't access this page without coming from a password reset email. If you do come from a password reset email, please make sure you used the full URL provided.
      no_token: "このページにアクセスする事が出来ません。正しいURLでアクセスしている事を確認して下さい。"
      # You will receive an email with instructions about how to reset your password in a few minutes.
      send_instructions: "パスワードのリセット方法を数分以内にメールでご連絡します。"
      # If your email address exists in our database, you will receive a password recovery link at your email address in a few minutes.
      send_paranoid_instructions: "ご登録のメールアドレスが保存されている場合、パスワード復旧用のリンク先をメールでご連絡します。"
      # Your password was changed successfully. You are now signed in.
      updated: "パスワードを変更しました。ログイン済みです。"
      # Your password was changed successfully.
      updated_not_active: "パスワードを変更しました。"
    registrations:
      # Bye! Your account was successfully cancelled. We hope to see you again soon.
      destroyed: "ご利用ありがとうございました。アカウントが削除されました。またのご利用をお待ちしています。"
      # Welcome! You have signed up successfully.
      signed_up: "ようこそ! アカウントが登録されました。"
      # You have signed up successfully. However, we could not sign you in because your account is not yet activated.
      signed_up_but_inactive: "アカウントは登録されていますが、アクティブになっていないため利用できません。"
      # You have signed up successfully. However, we could not sign you in because your account is locked.
      signed_up_but_locked: "アカウントは登録されていますが、ロックされているため利用できません。"
      # A message with a confirmation link has been sent to your email address. Please open the link to activate your account.
      signed_up_but_unconfirmed: "確認メールを登録したメールアドレス宛に送信しました。リンクを開いてアカウントを有効にして下さい。"
      # You updated your account successfully, but we need to verify your new email address. Please check your email and click on the confirm link to finalize confirming your new email address.
      update_needs_confirmation: "アカウント情報が更新されました。更新の確認メールを新しいメールアドレス宛に送信しましたので、リンクを開いて更新を有効にして下さい。"
      # You updated your account successfully.
      updated: "アカウントが更新されました。"
    sessions:
      # Signed in successfully.
      signed_in: "ログインしました。"
      # Signed out successfully.
      signed_out: "ログアウトしました。"
    unlocks:
      # You will receive an email with instructions about how to unlock your account in a few minutes.
      send_instructions: "アカウントのロックを解除する方法を数分以内にメールでご連絡します。"
      # If your account exists, you will receive an email with instructions about how to unlock it in a few minutes.
      send_paranoid_instructions: "アカウントが存在する場合、ロックを解除する方法をメールでご連絡します。"
      # Your account has been unlocked successfully. Please sign in to continue.
      unlocked: "アカウントのロックが解除されました。ログインしています。"
  errors:
    messages:
      # was already confirmed, please try signing in
      already_confirmed: "は既に登録済みです。ログインしてください"
      # needs to be confirmed within %{period}, please request a new one
      confirmation_period_expired: "%{period}以内に確認する必要がありますので、新しくリクエストしてください。"
      # has expired, please request a new one
      expired: "有効期限切れです。新規登録してください。"
      # not found
      not_found: "は見つかりませんでした。"
      # was not locked
      not_locked: "ロックされていません。"
      not_saved:
        # 1 error prohibited this %{resource} from being saved:
        one: "エラーにより、この %{resource} を保存できません:"
        # %{count} errors prohibited this %{resource} from being saved:
        other: "%{count} 個のエラーにより、この %{resource} を保存できません:"

-----------------------------------------------------------------------
devise.ja.ymlは、guthubなどで公開してくれている人のを参考に足りないトコは自分で訳す感じで作りました。
訳はだいぶざっくりなので意味合い違ってたらゴメン。
なお、利用しているdeviseのバージョンは2.2.3です。
参考にさせて貰ったdevise.ja.yml
github: Junsuke / miscellaneous / devise.ja.yml
作成が終わったら設定のlocaleを"ja"に変更して日本語の多言語化ファイルを読み込むようにします。
% vim config/application.rb
---------------------------------------
## 以下の行のコメントを外して設定値を":ja"に変更する

# config.i18n.default_locale = :de
↓↓↓
config.i18n.default_locale = :ja
---------------------------------------
WEBrickの起動、またはrailsを再起動してsign_inページを開きます。
% touch tmp/restart.txt
email、パスワード未入力などで何らかのメッセージが画面に表示される操作を行い、メッセージが日本語になっている事を確認します。
http://localhost:3000/users/sign_in
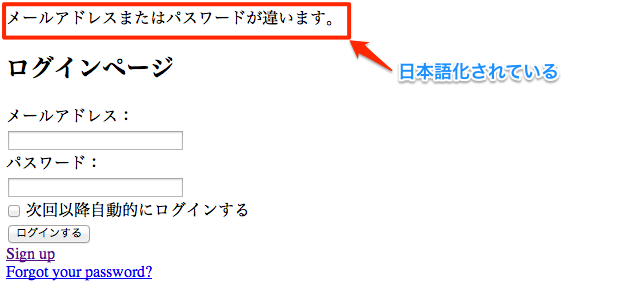
細かいとこの日本語化は進めながらやるとして、とりあえず日本語化が出来ました。
【Rails(3.2系)開発】deviseを利用して認証処理を作ってみる(導入編) [rails]
仕事で認証システムを作ることになったので、予習・勉強を兼ねてdeviseを使ってみる。
GitHub: devise
ちなみにdeviseとは認証系で一番人気のプラグインで、認証に必要なひと通りの機能(ログイン/ログアウト、アカウント登録、パスワード再発行、など)を網羅する事が出来ます。
また、関連する別のプラグインを組み合わせる事で、role権限やtwitter、facebook認証なども作れるらしいです。
まずはインストールから。
Gemfileに'devise'を記述してbundleでinstallします。
次にdeviseを使うために必要ファイルをgenerateします。
なおgenerateする時にdatabase.ymlに記述されたDBが起動していないとエラーが発生するので起動を忘れずに。
コンソールにsetupに必要な作業が表示されるのでそれを実施します。
次は認証管理するDBテーブルを作成する。
とりあえずセオリーに従って"User"で作成する。
アクセス可能なURLを確認し、WEBrickを起動し動作を確認する。
アクセスしてみる。
http://localhost:3000/users/sign_in
無事に動作を確認出来た。
・・とはいえ、仕事で使う要件以上の機能があったら違ったりして色々とカスタマイズの必要がありそう。
そもそも表示が英語だし
って事で次回から色々とカスタマイズした内容を書いて行きたいと思います。
予定としては、
・日本語化
・Viewのカスタマイズ
・機能の絞り込み
・ログイン/ログアウト後のページ変更
・複数Model対応
・Role権限追加
・Twitter/Facebook認証と連携(仕事関係なしの個人的興味なので優先度低)
な感じで進めて行きます。
【おまけ】Routing Errorが発生してsign_out出来なくなった時の対処法
職場環境だけ出た問題で、自宅では発生しませんでした。
環境/設定などの要因によるかもしれないけど、もし同じ症状が出たら試してみるといいかもです。
ちなみに問題が出たsign_outを行うタグは以下の通り。
自宅・職場共にほぼ同じタグなので書き方は間違ってないと思う。
色々と調べていたら↓の記事を見つけた。どうやらjsの問題らしい。
Rails3+jQueryでデータ削除ができない
エラー画面を見る限りリクエストをGETで投げていたので、同じ症状かもしれないって事でrails.jsを入れてみる。
以下からファイルを取得し、
GitHub: rails / jquery-ujs
上記からrails.jsを取得し、app/assets/javascripts配下に置く。
置いたらファイルを読み込むように設定を変更する。
で動くようになりました。
GitHub: devise
ちなみにdeviseとは認証系で一番人気のプラグインで、認証に必要なひと通りの機能(ログイン/ログアウト、アカウント登録、パスワード再発行、など)を網羅する事が出来ます。
また、関連する別のプラグインを組み合わせる事で、role権限やtwitter、facebook認証なども作れるらしいです。
まずはインストールから。
Gemfileに'devise'を記述してbundleでinstallします。
% vim Gemfile
------------------------------------------------
gem 'devise'
------------------------------------------------

% bundle install --path vendor/bundle
Fetching gem metadata from https://rubygems.org/...........
Fetching gem metadata from https://rubygems.org/..
Resolving dependencies...
 (中略)
Installing bcrypt-ruby (3.0.1)
Installing orm_adapter (0.4.0)
Installing warden (1.2.1)
Installing devise (2.2.3)
次にdeviseを使うために必要ファイルをgenerateします。
なおgenerateする時にdatabase.ymlに記述されたDBが起動していないとエラーが発生するので起動を忘れずに。
% bundle exec rails generate devise:install
      create  config/initializers/devise.rb
      create  config/locales/devise.en.yml
===============================================================================

Some setup you must do manually if you haven't yet:

  1. Ensure you have defined default url options in your environments files. Here
     is an example of default_url_options appropriate for a development environment
     in config/environments/development.rb:

       config.action_mailer.default_url_options = { :host => 'localhost:3000' }

     In production, :host should be set to the actual host of your application.

  2. Ensure you have defined root_url to *something* in your config/routes.rb.
     For example:

       root :to => "home#index"

  3. Ensure you have flash messages in app/views/layouts/application.html.erb.
     For example:

       <%= notice %>
       <%= alert %>

  4. If you are deploying Rails 3.1+ on Heroku, you may want to set:

       config.assets.initialize_on_precompile = false

     On config/application.rb forcing your application to not access the DB
     or load models when precompiling your assets.

  5. You can copy Devise views (for customization) to your app by running:

       rails g devise:views

===============================================================================
コンソールにsetupに必要な作業が表示されるのでそれを実施します。
% vim my_app/config/environments/development.rb
-----------------------------------------------------------------------
# device
config.action_mailer.default_url_options = { host: 'localhost:3000' }
-----------------------------------------------------------------------

% vim my_app/config/routes.rb
-----------------------------------------------------------------------
# root_path
root to: "top#index"
-----------------------------------------------------------------------

% vim my_app/app/views/layouts/application.html.erb
-----------------------------------------------------------------------


<%-# device -%>
<%= notice %>
<%= alert %>

<%= yield %>
-----------------------------------------------------------------------

% bundle exec rails g devise:views
      invoke  Devise::Generators::SharedViewsGenerator
      create    app/views/devise/shared
      create    app/views/devise/shared/_links.erb
      invoke  form_for
      create    app/views/devise/confirmations
      create    app/views/devise/confirmations/new.html.erb
      create    app/views/devise/passwords
      create    app/views/devise/passwords/edit.html.erb
      create    app/views/devise/passwords/new.html.erb
      create    app/views/devise/registrations
      create    app/views/devise/registrations/edit.html.erb
      create    app/views/devise/registrations/new.html.erb
      create    app/views/devise/sessions
      create    app/views/devise/sessions/new.html.erb
      create    app/views/devise/unlocks
      create    app/views/devise/unlocks/new.html.erb
      invoke  erb
      create    app/views/devise/mailer
      create    app/views/devise/mailer/confirmation_instructions.html.erb
      create    app/views/devise/mailer/reset_password_instructions.html.erb
      create    app/views/devise/mailer/unlock_instructions.html.erb

# 4.はHerokuで動作させる場合に必要な設定なのでスキップ。
次は認証管理するDBテーブルを作成する。
とりあえずセオリーに従って"User"で作成する。
% bundle exec rails g devise User
      invoke  active_record
      create    db/migrate/20130420134830_devise_create_users.rb
      create    app/models/user.rb
      invoke    test_unit
      create      test/unit/user_test.rb
      create      test/fixtures/users.yml
      insert    app/models/user.rb
       route  devise_for :users

db:migrateを実施しDBにテーブルを作成する。

% bundle exec rake db:migrate RAILS_ENV=development
==  DeviseCreateUsers: migrating ==============================================
-- create_table(:users)
   -> 0.0257s
-- add_index(:users, :email, {:unique=>true})
   -> 0.0140s
-- add_index(:users, :reset_password_token, {:unique=>true})
   -> 0.0132s
==  DeviseCreateUsers: migrated (0.0532s) =====================================
アクセス可能なURLを確認し、WEBrickを起動し動作を確認する。
% bundle exec rake routes
        new_user_session GET    /users/sign_in(.:format)       devise/sessions#new
            user_session POST   /users/sign_in(.:format)       devise/sessions#create
    destroy_user_session DELETE /users/sign_out(.:format)      devise/sessions#destroy
           user_password POST   /users/password(.:format)      devise/passwords#create
       new_user_password GET    /users/password/new(.:format)  devise/passwords#new
      edit_user_password GET    /users/password/edit(.:format) devise/passwords#edit
                         PUT    /users/password(.:format)      devise/passwords#update
cancel_user_registration GET    /users/cancel(.:format)        devise/registrations#cancel
       user_registration POST   /users(.:format)               devise/registrations#create
   new_user_registration GET    /users/sign_up(.:format)       devise/registrations#new
  edit_user_registration GET    /users/edit(.:format)          devise/registrations#edit
                         PUT    /users(.:format)               devise/registrations#update
                         DELETE /users(.:format)               devise/registrations#destroy
                    root        /                              top#index

% bundle exec rails server -e development
=> Booting WEBrick
=> Rails 3.2.13 application starting in development on http://0.0.0.0:3000
=> Call with -d to detach
=> Ctrl-C to shutdown server
[2013-04-20 22:54:15] INFO  WEBrick 1.3.1
[2013-04-20 22:54:15] INFO  ruby 1.9.3 (2013-01-15) [x86_64-darwin12.2.1]
[2013-04-20 22:54:15] INFO  WEBrick::HTTPServer#start: pid=19120 port=3000
アクセスしてみる。
http://localhost:3000/users/sign_in
無事に動作を確認出来た。
・・とはいえ、仕事で使う要件以上の機能があったら違ったりして色々とカスタマイズの必要がありそう。
そもそも表示が英語だし
って事で次回から色々とカスタマイズした内容を書いて行きたいと思います。
予定としては、
・日本語化
・Viewのカスタマイズ
・機能の絞り込み
・ログイン/ログアウト後のページ変更
・複数Model対応
・Role権限追加
・Twitter/Facebook認証と連携(仕事関係なしの個人的興味なので優先度低)
な感じで進めて行きます。
【おまけ】Routing Errorが発生してsign_out出来なくなった時の対処法
職場環境だけ出た問題で、自宅では発生しませんでした。
環境/設定などの要因によるかもしれないけど、もし同じ症状が出たら試してみるといいかもです。
ちなみに問題が出たsign_outを行うタグは以下の通り。
<%= link_to "ログアウト", destroy_user_session_path, method: :delete %>
自宅・職場共にほぼ同じタグなので書き方は間違ってないと思う。
色々と調べていたら↓の記事を見つけた。どうやらjsの問題らしい。
Rails3+jQueryでデータ削除ができない
エラー画面を見る限りリクエストをGETで投げていたので、同じ症状かもしれないって事でrails.jsを入れてみる。
以下からファイルを取得し、
GitHub: rails / jquery-ujs
上記からrails.jsを取得し、app/assets/javascripts配下に置く。
置いたらファイルを読み込むように設定を変更する。
% vim app/assets/javascripts/application.js
-----------------------------------------------------------------------
//= require jquery
//= require rails   ## <=追加
-----------------------------------------------------------------------

% vim app/config/application.rb
-----------------------------------------------------------------------
# javascript library
config.action_view.javascript_expansions[:defaults] = %w(jquery rails)
-----------------------------------------------------------------------
で動くようになりました。
MacでRails(3.2系)アプリケーションを開発する前にやっておくべきこと [rails]
ちょっと間が開いてしまいましたが、前回(MacにRails3.2.13を入れてみた。)の続きです。
Railsの環境が出来ると、とりあえず何か作ってみよう!となりますが、開発をスムーズに行うためにも先に以下の事をやっておくと後で昔の自分GJ!となります。
1. DB(MySQL)のGUIクライアントツールの導入
2. ソースコードのGit管理
3. debug環境の設定
1.はともかく、2.、3.については、技術系入門書でも触れられていない事が多く、割と知らない人が多い気がします。
ただ仕事でやる人に取っては必須となっていて、個人で開発・勉強する上でも役立つので面倒くさがらずやっておいたほうがいいです。
1. DB(MySQL)のGUIクライアントツールの導入
Railsに限らず何らかのアプリを開発する上でDBアクセスは避けては通れないので、DBの中身を簡単にチェック出来るGUIツールを用意したほうがいいです。
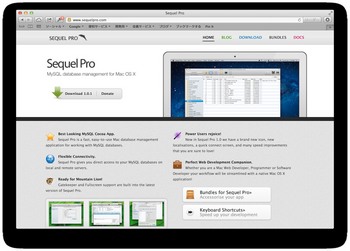
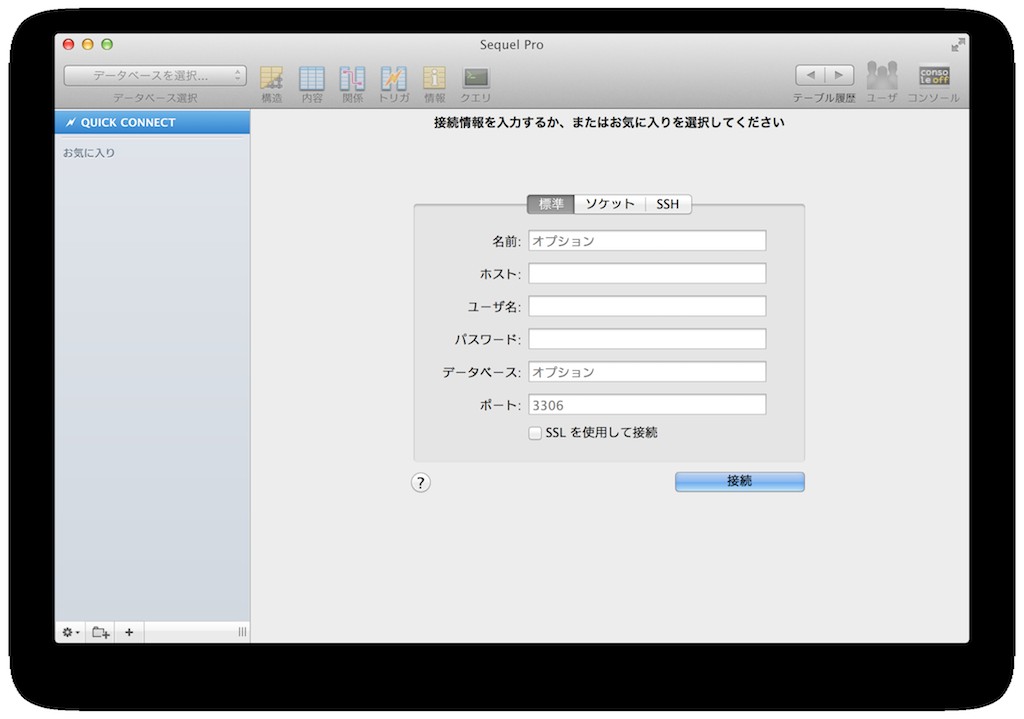
MySQLのGUIクライアントツールはブラウザベースのMySQL Adminが有名で、実際に自分も仕事ではこっちを使っていますが、"Sequel Pro"というオープンソースのMySQL GUIクライアントツールの評判がいいので今回はこっちを使ってみます。
Sequel Pro
"Download"ボタンをクリックしてアプリケーションをダウンロードしてインストールします。
# 2013/04/13時点の最新 1.0.1
インストールしたアプリケーションを起動し、MySQLの接続情報を入力して接続できる事を確認します。
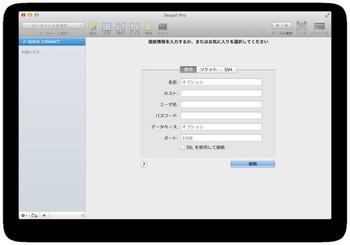
なお、テーブルはまだ作られていないので、細かい使い方や確認などはいずれまた。
2. ソースコードのGit管理
Gitとはバージョン管理ソフトの1つです。
Macにはdefaultで入っているので特に設定することなく利用することが出来ます。
オレオレ開発でもバージョン管理してこまめにコミットしておけばいつか助かったと思える日が来ます。
なので未来の自分のために入れておくといいと思います。
Gitレポジトリを作る前に以下の設定を入れておきます。
この設定は誰がコミットしたかを表す設定なのでソロ開発では必要ないといえば必要ないのですが、今後githubや最近流行りのソーシャルコーディングなどをやった際設定漏れしてると全力で履歴に残り若干恥ずかしいので、後々忘れる前に設定しておくといいです。
あとはカラーリングしておくと見やすくなって便利です。
初期設定が終わったらGitレポジトリを作成します。
Git管理したいアプリケーションをカレントにしinitコマンドを叩きます。
今回はRailsテスト用に作った"my_app"をレポジトリ管理します。
レポジトリ作成はこれで完了。
"my_app"フォルダにはnewしたrailsアプリケーションがあるのでとりあえず初期コミットします。
ただし、ログとかgit管理したくないファイルもあるので、除外するファイルを設定します。
.gitignoreには最初からいくつか設定されていますが、とりあえず自分が追加設定したのは上記2点。
/log配下には(たぶん)ログファイルしか置かないので全部除外にして、/vendorもGemfile管理で大丈夫なので対象外としました。
あとは必要に応じて追加したりします。
ここまで終わったら初期コミットします。
まずは全部なので、"add ." => "commit"を実行します。
Gitに慣れてない人はとりあえず add / commit / status / diff の4つだけ覚えておけば当面は大丈夫、なハズ。
1歩進んだ事をしたくなったらそこはもうGoogle先生に・・・
余談だけど個人的に初心者にオススメGit本。
Git本はのべ3冊読んだけど、これが一番わかりやすい。
自分は仕事でGitを使い始めたのも最近で、それまでずっとSVNを使っていました。
そのせいなのか、最初はGitの扱いにだいぶ苦戦して前のバージョンに戻すのも一苦労してました。
Git本で有名なの書籍として秀和システムやオーム社の書籍がありますが、Gitをあまり理解していない人が入門書として読むと心が折れる気がする。
上記の本はあまりに逆に入門的な空気が出すぎていて買う時に別の勇気が必要となりますが、この本に書かれている内容をひと通りこなすと最低限Gitを使えるようになるので、本当の入門書を求めている場合はオススメです。
3. debug環境の設定
自宅で趣味や勉強がてらに触る人にはあまり必要ないかと思われがちですが、いざハマった時にちゃんとしたdebugを行えるかどうかで効率は大きく変わるので導入しておいて損はないと思います。
debug環境の設定についてですが、具体的には以下の2つ(関連含めると3つ)のGemをインストールします。
・debugger
・better_errors(+ binding_of_caller)
まずは、debuggerから。
こちらはdefaultで作られるGemfileの中に記述が既にあり、コメントで寝かされている状態なのでそれを取っ払ってbundle installします。
インストールはこれで完了。
以下、簡単な使い方について。
とりあえずテスト用に適当なコントローラーを作ります。
ViewとActionも実装し、Actionのdebugしたい場所にブレイクポイントを設置します。
ブレイクポイントを仕込んだらWEBrickを"--debugger"オプションをつけて起動します。
ブラウザでアクセスしてみる。
http://0.0.0.0:3000/top/index
そうすると画面の読み込み途中で止まってしまいます。
コンソールをチェックすると以下の様な表示が出ています。
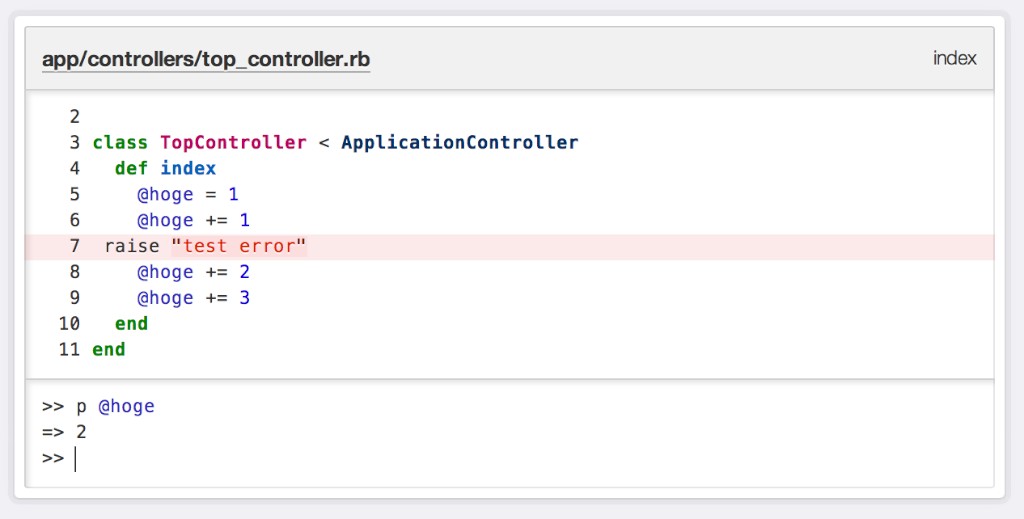
これは"debugger"文(ブレイクポイント)を差し込んだ行で処理が停止している状態になっています。
"p"コマンドでこの時点での変数の値を確認できるので"@hoge"に設定されている値を確認します。
ループ前にブレイクポイントを入れているので、初期値の"1"が表示されます。
"list"コマンドを叩くことで周辺のソースコードを確認することが出来ます。
次に処理を1行進めてみます。処理を進めるのは"next"コマンドです。
1行進めることで次の処理である"@hoge += 1"が実行され、@hogeには"2"が設定されます。
なお"next"コマンドは、"n"でも実行出来ますので、それを打ってもう1行進めます。
こうやって"next"コマンドを叩くことで1行ずつ処理が実施されるので、処理がどのように行われているかを追うことが出来ます。
確認が終わったら"continue"コマンドを叩けば残りの処理が実行され、次のブレイクポイントまで処理が進みます。他にブレイクポイントが無ければそのまま処理が完了します。
一見面倒に思えますが、このようにどこでどのような処理/エラーが起きているかが明確にわかるので、当たりをつけて何度もdebug用コードを差し込むより、早く原因を特定する事が出来ます。
これはアプリケーションがより巨大に、複雑になればなるほど効果を発揮します。
なお、今回利用したコマンド以外のコマンドについては"h(help)"コマンドで確認できます(英語)。
短縮コマンドもこれで確認することが出来ます。
debuggerの設定が終わったら次は"better_errors"Gemを入れます。
こちらはRailsのエラー画面を強化するGemで、Railsに標準で入れて欲しいとの声もあるほど有名なGemです。
GitHub: better_errors
GitHubのREADMEにも書いてあるように、"binding_of_caller"プラグインもセットで入れます。
これによりエラー画面上でirbが使えるようになるのでよりdebug作業が楽になります。
GemをインストールするためにGemfileに追記し、bundle installを実施します。
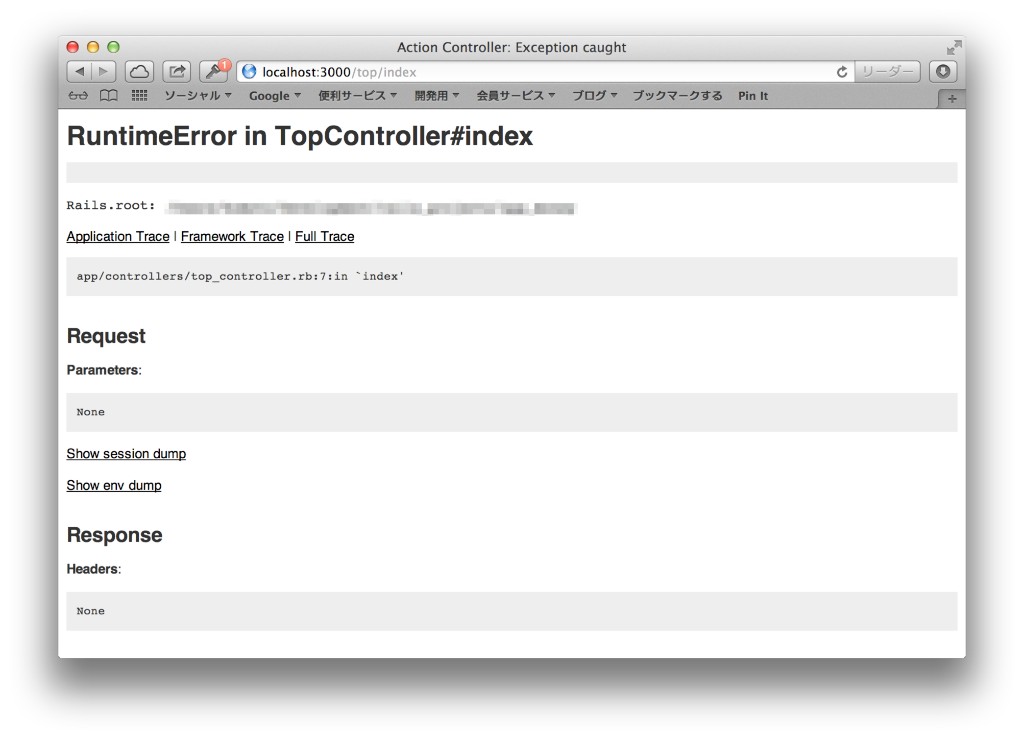
インストールが終わったら、試しにエラーを発生させてみます。
エラーページを確認すると、標準のエラー画面に比べ情報が整理され見やすくなっています。
[Before]
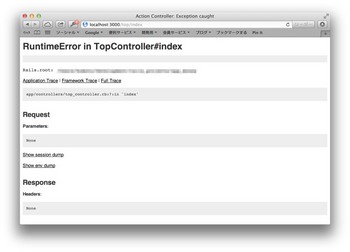
[After]
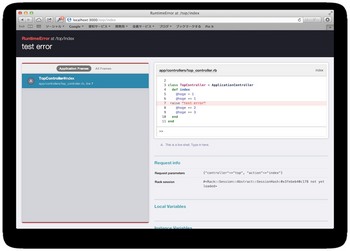
画面右上のソースコード表示部にはirbが起動しているので、そこからエラー発生時の変数の値などを確認することができます。

debuggerとbetter_errorsによりRailsアプリのdebugはだいぶ楽になると思います。
Railsの環境が出来ると、とりあえず何か作ってみよう!となりますが、開発をスムーズに行うためにも先に以下の事をやっておくと後で昔の自分GJ!となります。
1. DB(MySQL)のGUIクライアントツールの導入
2. ソースコードのGit管理
3. debug環境の設定
1.はともかく、2.、3.については、技術系入門書でも触れられていない事が多く、割と知らない人が多い気がします。
ただ仕事でやる人に取っては必須となっていて、個人で開発・勉強する上でも役立つので面倒くさがらずやっておいたほうがいいです。
1. DB(MySQL)のGUIクライアントツールの導入
Railsに限らず何らかのアプリを開発する上でDBアクセスは避けては通れないので、DBの中身を簡単にチェック出来るGUIツールを用意したほうがいいです。
MySQLのGUIクライアントツールはブラウザベースのMySQL Adminが有名で、実際に自分も仕事ではこっちを使っていますが、"Sequel Pro"というオープンソースのMySQL GUIクライアントツールの評判がいいので今回はこっちを使ってみます。
Sequel Pro
"Download"ボタンをクリックしてアプリケーションをダウンロードしてインストールします。
# 2013/04/13時点の最新 1.0.1

インストールしたアプリケーションを起動し、MySQLの接続情報を入力して接続できる事を確認します。
なお、テーブルはまだ作られていないので、細かい使い方や確認などはいずれまた。
2. ソースコードのGit管理
Gitとはバージョン管理ソフトの1つです。
Macにはdefaultで入っているので特に設定することなく利用することが出来ます。
オレオレ開発でもバージョン管理してこまめにコミットしておけばいつか助かったと思える日が来ます。
なので未来の自分のために入れておくといいと思います。
Gitレポジトリを作る前に以下の設定を入れておきます。
% git config --global user.name "[自分のUserName]"
% git config --global user.email "[自分のMailAddress]"
この設定は誰がコミットしたかを表す設定なのでソロ開発では必要ないといえば必要ないのですが、今後githubや最近流行りのソーシャルコーディングなどをやった際設定漏れしてると全力で履歴に残り若干恥ずかしいので、後々忘れる前に設定しておくといいです。
あとはカラーリングしておくと見やすくなって便利です。
% git config --global color.ui auto
初期設定が終わったらGitレポジトリを作成します。
Git管理したいアプリケーションをカレントにしinitコマンドを叩きます。
今回はRailsテスト用に作った"my_app"をレポジトリ管理します。
% cd ~/developments/rails/my_app
% git init
Initialized empty Git repository in /Users/*******/developments/rails/my_app/.git/
レポジトリ作成はこれで完了。
"my_app"フォルダにはnewしたrailsアプリケーションがあるのでとりあえず初期コミットします。
ただし、ログとかgit管理したくないファイルもあるので、除外するファイルを設定します。
% vim .gitignore
======================================
## 変更
# Ignore all logfiles and tempfiles.
#/log/*.log
/log

##追加
/vendor
======================================
.gitignoreには最初からいくつか設定されていますが、とりあえず自分が追加設定したのは上記2点。
/log配下には(たぶん)ログファイルしか置かないので全部除外にして、/vendorもGemfile管理で大丈夫なので対象外としました。
あとは必要に応じて追加したりします。
ここまで終わったら初期コミットします。
まずは全部なので、"add ." => "commit"を実行します。
% git add .
% git commit -m "初期コミット"
 37 files changed, 1227 insertions(+)
 create mode 100644 .gitignore
 create mode 100644 Gemfile
 create mode 100644 Gemfile.lock
  (中略)
 create mode 100644 test/test_helper.rb
 create mode 100644 test/unit/.gitkeep
Gitに慣れてない人はとりあえず add / commit / status / diff の4つだけ覚えておけば当面は大丈夫、なハズ。
1歩進んだ事をしたくなったらそこはもうGoogle先生に・・・
余談だけど個人的に初心者にオススメGit本。
Git本はのべ3冊読んだけど、これが一番わかりやすい。
自分は仕事でGitを使い始めたのも最近で、それまでずっとSVNを使っていました。
そのせいなのか、最初はGitの扱いにだいぶ苦戦して前のバージョンに戻すのも一苦労してました。
Git本で有名なの書籍として秀和システムやオーム社の書籍がありますが、Gitをあまり理解していない人が入門書として読むと心が折れる気がする。
上記の本はあまりに逆に入門的な空気が出すぎていて買う時に別の勇気が必要となりますが、この本に書かれている内容をひと通りこなすと最低限Gitを使えるようになるので、本当の入門書を求めている場合はオススメです。
3. debug環境の設定
自宅で趣味や勉強がてらに触る人にはあまり必要ないかと思われがちですが、いざハマった時にちゃんとしたdebugを行えるかどうかで効率は大きく変わるので導入しておいて損はないと思います。
debug環境の設定についてですが、具体的には以下の2つ(関連含めると3つ)のGemをインストールします。
・debugger
・better_errors(+ binding_of_caller)
まずは、debuggerから。
こちらはdefaultで作られるGemfileの中に記述が既にあり、コメントで寝かされている状態なのでそれを取っ払ってbundle installします。
% vim Gemfile
======================================
# To use debugger
## コメントを外し有効にする
gem 'debugger'
======================================

% bundle install --path vendor/bundle
Fetching gem metadata from https://rubygems.org/...........
Fetching gem metadata from https://rubygems.org/..
Resolving dependencies...
  (中略)
Installing columnize (0.3.6)
Installing debugger-linecache (1.2.0)
Installing debugger-ruby_core_source (1.2.0)
Installing debugger (1.5.0)
インストールはこれで完了。
以下、簡単な使い方について。
とりあえずテスト用に適当なコントローラーを作ります。
% bundle exec rails generate controller Hoge index
      create  app/controllers/hoge_controller.rb
       route  get "hoge/index"
      (以下略)
ViewとActionも実装し、Actionのdebugしたい場所にブレイクポイントを設置します。
% vim app/controllers/hoge_controller.rb
======================================
# coding: utf-8
class HogeController < ApplicationController
  def index
    @hoge1 = 1
debugger    # ブレイクポイント
    @hoge += 1
    @hoge += 2
    @hoge += 3
  end
end
======================================

% vim app/controllers/hoge/index.html.erb
======================================
テスト:<%= @hoge %>
======================================
ブレイクポイントを仕込んだらWEBrickを"--debugger"オプションをつけて起動します。
% bundle exec rails server --debugger
=> Booting WEBrick
=> Rails 3.2.13 application starting in development on http://0.0.0.0:3000
=> Call with -d to detach
=> Ctrl-C to shutdown server
=> Debugger enabled
[2013-04-07 21:17:24] INFO  WEBrick 1.3.1
[2013-04-07 21:17:24] INFO  ruby 1.9.3 (2013-01-15) [x86_64-darwin12.2.1]
[2013-04-07 21:17:24] INFO  WEBrick::HTTPServer#start: pid=21002 port=3000
ブラウザでアクセスしてみる。
http://0.0.0.0:3000/top/index
そうすると画面の読み込み途中で止まってしまいます。
コンソールをチェックすると以下の様な表示が出ています。
Users/*******/developments/rails/my_app/app/controllers/hoge_controller.rb:7
@hoge += 1
(rdb:2)
これは"debugger"文(ブレイクポイント)を差し込んだ行で処理が停止している状態になっています。
"p"コマンドでこの時点での変数の値を確認できるので"@hoge"に設定されている値を確認します。
(rdb:2) p @hoge
1
ループ前にブレイクポイントを入れているので、初期値の"1"が表示されます。
"list"コマンドを叩くことで周辺のソースコードを確認することが出来ます。
(rdb:2) list
[2, 11] in /Users/*******/developments/rails/my_app/app/controllers/hoge_controller.rb
   2
   3  class TopController < ApplicationController
   4    def index
   5      @hoge = 1
   6      debugger
=> 7      @hoge += 1
   8      @hoge += 2
   9      @hoge += 3
   10    end
   11  end
次に処理を1行進めてみます。処理を進めるのは"next"コマンドです。
(rdb:2) next
Users/*******/developments/rails/my_app/app/controllers/hoge_controller.rb:8
@hoge += 2
(rdb:2) p @hoge
2
1行進めることで次の処理である"@hoge += 1"が実行され、@hogeには"2"が設定されます。
なお"next"コマンドは、"n"でも実行出来ますので、それを打ってもう1行進めます。
(rdb:2) n
Users/*******/developments/rails/my_app/app/controllers/hoge_controller.rb:9
@hoge += 3
(rdb:2) p @hoge
4
こうやって"next"コマンドを叩くことで1行ずつ処理が実施されるので、処理がどのように行われているかを追うことが出来ます。
確認が終わったら"continue"コマンドを叩けば残りの処理が実行され、次のブレイクポイントまで処理が進みます。他にブレイクポイントが無ければそのまま処理が完了します。
(rdb:2) continue

Started GET "/hoge/index" for 127.0.0.1 at 2013-04-07 21:31:51 +0900
Processing by HogeController#index as HTML
  Rendered hoge/index.html.erb within layouts/application (19.9ms)
Completed 200 OK in 457560ms (Views: 57.6ms | ActiveRecord: 0.0ms)
一見面倒に思えますが、このようにどこでどのような処理/エラーが起きているかが明確にわかるので、当たりをつけて何度もdebug用コードを差し込むより、早く原因を特定する事が出来ます。
これはアプリケーションがより巨大に、複雑になればなるほど効果を発揮します。
なお、今回利用したコマンド以外のコマンドについては"h(help)"コマンドで確認できます(英語)。
短縮コマンドもこれで確認することが出来ます。
(rdb:2) help ruby-debug help v1.5.0 Type 'help' for help on a specific command Available commands: backtrace delete enable help list ps save start undisplay break disable eval info method putl set step up catch display exit irb next quit show thread var condition down finish jump p reload skip tmate where continue edit frame kill pp restart source trace (rdb:3) help next n[ext][+-]?[ nnn] step over once or nnn times, '+' forces to move to another line. '-' is the opposite of '+' and disables the force_stepping setting.
debuggerの設定が終わったら次は"better_errors"Gemを入れます。
こちらはRailsのエラー画面を強化するGemで、Railsに標準で入れて欲しいとの声もあるほど有名なGemです。
GitHub: better_errors
GitHubのREADMEにも書いてあるように、"binding_of_caller"プラグインもセットで入れます。
これによりエラー画面上でirbが使えるようになるのでよりdebug作業が楽になります。
GemをインストールするためにGemfileに追記し、bundle installを実施します。
% vim Gemfile
======================================
# better_errors
gem 'better_errors'
gem 'binding_of_caller'
======================================

% bundle install --path vendor/bundle
Fetching gem metadata from https://rubygems.org/...........
Fetching gem metadata from https://rubygems.org/..
Resolving dependencies…
  (中略)
Installing coderay (1.0.9)
Installing better_errors (0.8.0)
Installing debug_inspector (0.0.2)
Installing binding_of_caller (0.7.1)
インストールが終わったら、試しにエラーを発生させてみます。
% vim app/controllers/hoge_controller.rb
======================================
# coding: utf-8
class HogeController < ApplicationController
  def index
    @hoge1 = 1
    @hoge += 1
# 人為的にエラーを発生させる
raise
    @hoge += 2
    @hoge += 3
  end
end
======================================
エラーページを確認すると、標準のエラー画面に比べ情報が整理され見やすくなっています。
[Before]
[After]
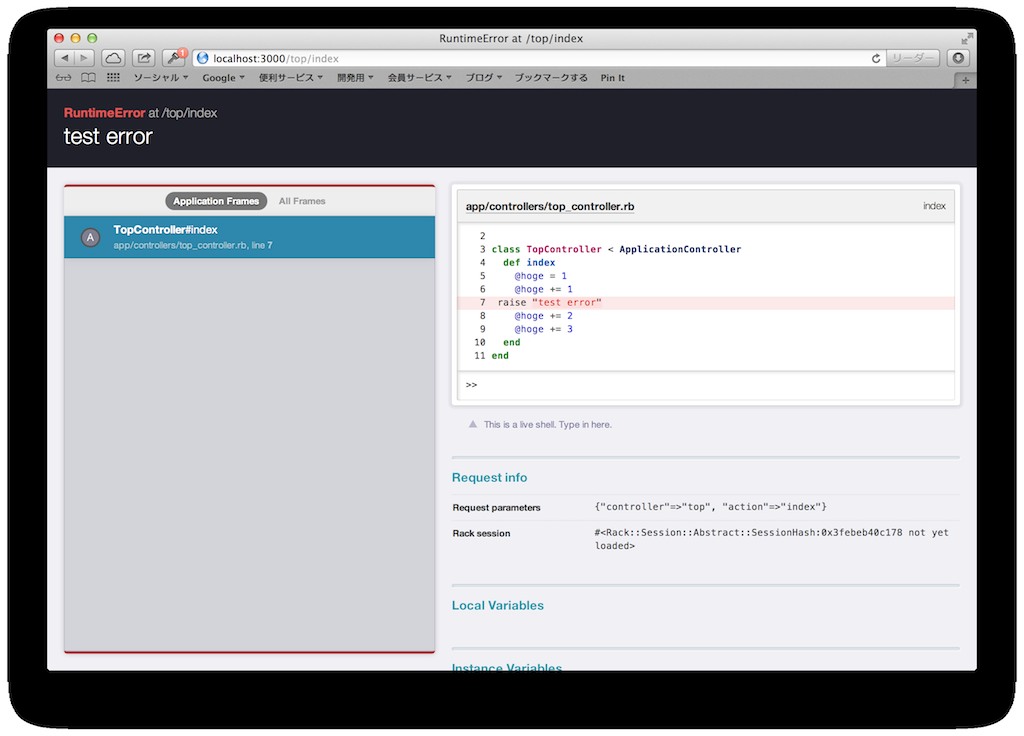
画面右上のソースコード表示部にはirbが起動しているので、そこからエラー発生時の変数の値などを確認することができます。
debuggerとbetter_errorsによりRailsアプリのdebugはだいぶ楽になると思います。
MacにRails3.2.13を入れてみた。 [rails]
Mac開発環境作りの続き。
・Macで開発環境構築のための事前準備
・Macにrbenvでruby1.9.3を入れてみた
・homebrewでMySQL5.1を入れてみた
今回はRuby on Rails(3.2.13)をインストールします。
まずはBundlerのインストール。
rbenvで管理されているrubyと紐付けたいので、"rbenv exec"を利用してインストールする。
次にRailsのインストール。
Railsはアプリケーションごとにbundleを利用してインストールする。
そこでプロジェクトフォルダを作成し、そこにインストールに必要なGemfileを作成する。
なお、2013/3/29時点でRails3.2系の最新は3.2.13なのでそれを入れる。
必要なGemはもっとあるけど、Gemfileはrailsインストール用に割りきって作成。
次にbundleを利用してrailsをインストールする。
インストールする場所は、Rails標準らしい"vendor/bundle"を指定。
無事にインストール出来た!
続いてRailsアプリケーションを作成する。
なお、作成時にオプションを付けてDBはMySQLを利用する。
また、普通に作成するとオプションなしの"bundle install"自動的に実行されてしまうので、skipするオプションも追加しておく。
次に上書きされたGemfileのGemをインストールする。
これでアプリケーション(の土台)の作成が完了。
WEBrickを起動して動作を確認する。
エラる。MySQLにパスワードなしのrootで繋ぎにいってるから当然といえば当然か。
先にMySQLにテスト用のデータベースとアクセス用のユーザを作成する。
config/database.ymlにMySQLの設定を追加する。
設定が終わったらもう一度WEBrickを起動する
"http://0.0.0.0:3000"にアクセスし、無事に表示される事を確認。
また、"About your application's environment"テキストリンクもクリックし問題なし。
そんな訳でrailsが動くようにはなりました。
・Macで開発環境構築のための事前準備
・Macにrbenvでruby1.9.3を入れてみた
・homebrewでMySQL5.1を入れてみた
今回はRuby on Rails(3.2.13)をインストールします。
まずはBundlerのインストール。
rbenvで管理されているrubyと紐付けたいので、"rbenv exec"を利用してインストールする。
% rbenv exec gem install bundler
Fetching: bundler-1.3.4.gem (100%)
Successfully installed bundler-1.3.4
1 gem installed
Installing ri documentation for bundler-1.3.4...
Installing RDoc documentation for bundler-1.3.4...

% rbenv rehash
% rbenv exec bundle -v
Bundler version 1.3.4
次にRailsのインストール。
Railsはアプリケーションごとにbundleを利用してインストールする。
そこでプロジェクトフォルダを作成し、そこにインストールに必要なGemfileを作成する。
なお、2013/3/29時点でRails3.2系の最新は3.2.13なのでそれを入れる。
% mkdir my_app
% vim my_app/Gemfile
====================================================
source 'http://rubygems.org'
gem 'rails', '3.2.13'
====================================================
必要なGemはもっとあるけど、Gemfileはrailsインストール用に割りきって作成。
次にbundleを利用してrailsをインストールする。
インストールする場所は、Rails標準らしい"vendor/bundle"を指定。
% cd my_app
% bundle install --path vendor/bundle

Fetching gem metadata from http://rubygems.org/...........
Fetching gem metadata from http://rubygems.org/..
Resolving dependencies...
Installing rake (10.0.4)
Installing i18n (0.6.1)
Installing multi_json (1.7.2)
Installing activesupport (3.2.13)
Installing builder (3.0.4)
Installing activemodel (3.2.13)
Installing erubis (2.7.0)
Installing journey (1.0.4)
Installing rack (1.4.5)
Installing rack-cache (1.2)
Installing rack-test (0.6.2)
Installing hike (1.2.1)
Installing tilt (1.3.6)
Installing sprockets (2.2.2)
Installing actionpack (3.2.13)
Installing mime-types (1.22)
Installing polyglot (0.3.3)
Installing treetop (1.4.12)
Installing mail (2.5.3)
Installing actionmailer (3.2.13)
Installing arel (3.0.2)
Installing tzinfo (0.3.37)
Installing activerecord (3.2.13)
Installing activeresource (3.2.13)
Using bundler (1.3.4)
Installing json (1.7.7)
Installing rack-ssl (1.3.3)
Installing rdoc (3.12.2)
Installing thor (0.18.1)
Installing railties (3.2.13)
Installing rails (3.2.13)
Your bundle is complete!
It was installed into ./vendor/bundle
Post-install message from rdoc:
Depending on your version of ruby, you may need to install ruby rdoc/ri data:

<= 1.8.6 : unsupported
 = 1.8.7 : gem install rdoc-data; rdoc-data --install
 = 1.9.1 : gem install rdoc-data; rdoc-data --install
>= 1.9.2 : nothing to do! Yay!

% bundle exec rails -v
Rails 3.2.13
無事にインストール出来た!
続いてRailsアプリケーションを作成する。
なお、作成時にオプションを付けてDBはMySQLを利用する。
また、普通に作成するとオプションなしの"bundle install"自動的に実行されてしまうので、skipするオプションも追加しておく。
% bundle exec rails new . -d mysql --skip-bundle
       exist
      create  README.rdoc
      create  Rakefile
      create  config.ru
      create  .gitignore
    conflict  Gemfile

# 途中で聞かれるGemfileの上書きはY(yes)を選択する
Overwrite /Users/**********/Development/my_app/Gemfile? (enter "h" for help) [Ynaqdh] Y
       force  Gemfile
      create  app
      create  app/assets/images/rails.png
      create  app/assets/javascripts/application.js
      create  app/assets/stylesheets/application.css
      create  app/controllers/application_controller.rb
      create  app/helpers/application_helper.rb
      create  app/views/layouts/application.html.erb
      create  app/mailers/.gitkeep
      create  app/models/.gitkeep
      create  config
      create  config/routes.rb
      create  config/application.rb
      create  config/environment.rb
      create  config/environments
      create  config/environments/development.rb
      create  config/environments/production.rb
      create  config/environments/test.rb
      create  config/initializers
      create  config/initializers/backtrace_silencers.rb
      create  config/initializers/inflections.rb
      create  config/initializers/mime_types.rb
      create  config/initializers/secret_token.rb
      create  config/initializers/session_store.rb
      create  config/initializers/wrap_parameters.rb
      create  config/locales
      create  config/locales/en.yml
      create  config/boot.rb
      create  config/database.yml
      create  db
      create  db/seeds.rb
      create  doc
      create  doc/README_FOR_APP
      create  lib
      create  lib/tasks
      create  lib/tasks/.gitkeep
      create  lib/assets
      create  lib/assets/.gitkeep
      create  log
      create  log/.gitkeep
      create  public
      create  public/404.html
      create  public/422.html
      create  public/500.html
      create  public/favicon.ico
      create  public/index.html
      create  public/robots.txt
      create  script
      create  script/rails
      create  test/fixtures
      create  test/fixtures/.gitkeep
      create  test/functional
      create  test/functional/.gitkeep
      create  test/integration
      create  test/integration/.gitkeep
      create  test/unit
      create  test/unit/.gitkeep
      create  test/performance/browsing_test.rb
      create  test/test_helper.rb
      create  tmp/cache
      create  tmp/cache/assets
      create  vendor/assets/javascripts
      create  vendor/assets/javascripts/.gitkeep
      create  vendor/assets/stylesheets
      create  vendor/assets/stylesheets/.gitkeep
      create  vendor/plugins
      create  vendor/plugins/.gitkeep
次に上書きされたGemfileのGemをインストールする。
% bundle install --path vendor/bundle
Fetching gem metadata from https://rubygems.org/...........
Fetching gem metadata from https://rubygems.org/..
Resolving dependencies...
Using rake (10.0.4)
Using i18n (0.6.1)
Using multi_json (1.7.2)
Using activesupport (3.2.13)
Using builder (3.0.4)
Using activemodel (3.2.13)
Using erubis (2.7.0)
Using journey (1.0.4)
Using rack (1.4.5)
Using rack-cache (1.2)
Using rack-test (0.6.2)
Using hike (1.2.1)
Using tilt (1.3.6)
Using sprockets (2.2.2)
Using actionpack (3.2.13)
Using mime-types (1.22)
Using polyglot (0.3.3)
Using treetop (1.4.12)
Using mail (2.5.3)
Using actionmailer (3.2.13)
Using arel (3.0.2)
Using tzinfo (0.3.37)
Using activerecord (3.2.13)
Using activeresource (3.2.13)
Using bundler (1.3.4)
Installing coffee-script-source (1.6.2)
Installing execjs (1.4.0)
Installing coffee-script (2.2.0)
Using rack-ssl (1.3.3)
Using json (1.7.7)
Using rdoc (3.12.2)
Using thor (0.18.1)
Using railties (3.2.13)
Installing coffee-rails (3.2.2)
Installing jquery-rails (2.2.1)
Installing mysql2 (0.3.11)
Using rails (3.2.13)
Installing sass (3.2.7)
Installing sass-rails (3.2.6)
Installing uglifier (1.3.0)
Your bundle is complete!
It was installed into ./vendor/bundle
これでアプリケーション(の土台)の作成が完了。
WEBrickを起動して動作を確認する。
% bundle exec rails server
=> Booting WEBrick
=> Rails 3.2.13 application starting in development on http://0.0.0.0:3000
=> Call with -d to detach
=> Ctrl-C to shutdown server
Exiting
/Users/************/Development/my_app/vendor/bundle/ruby/1.9.1/gems/mysql2-0.3.11/lib/mysql2/client.rb:44:in `connect': Access denied for user 'root'@'localhost' (using password: NO) (Mysql2::Error)
     from /Users/*********/Development/my_app/vendor/bundle/ruby/1.9.1/gems/mysql2-0.3.11/lib/mysql2/client.rb:44:in `initialize'
     from /Users/*********/Development/my_app/vendor/bundle/ruby/1.9.1/gems/activerecord-3.2.13/lib/active_record/connection_adapters/mysql2_adapter.rb:16:in `new'
(以下略)
エラる。MySQLにパスワードなしのrootで繋ぎにいってるから当然といえば当然か。
先にMySQLにテスト用のデータベースとアクセス用のユーザを作成する。
% mysql -u root -p

mysql> create database my_app_dev;
Query OK, 1 row affected (0.00 sec)

mysql> GRANT ALL PRIVILEGES ON my_app_dev.* TO testuser@localhost IDENTIFIED BY 'hogehoge' WITH GRANT OPTION;
config/database.ymlにMySQLの設定を追加する。
% vim config/database.yml
-----------------------------------------------------------
development:
  adapter: mysql2
  encoding: utf8
  reconnect: false
  database: my_app_dev
  pool: 5
  username: testuser
  password: hogehoge
  socket: /tmp/mysql.sock
-----------------------------------------------------------
設定が終わったらもう一度WEBrickを起動する
% bundle exec rails server
=> Booting WEBrick
=> Rails 3.2.13 application starting in development on http://0.0.0.0:3000
=> Call with -d to detach
=> Ctrl-C to shutdown server
[2013-03-31 20:11:34] INFO  WEBrick 1.3.1
[2013-03-31 20:11:34] INFO  ruby 1.9.3 (2013-01-15) [x86_64-darwin12.2.1]
[2013-03-31 20:11:34] INFO  WEBrick::HTTPServer#start: pid=42119 port=3000
"http://0.0.0.0:3000"にアクセスし、無事に表示される事を確認。
また、"About your application's environment"テキストリンクもクリックし問題なし。
そんな訳でrailsが動くようにはなりました。


